
If you completed the tasks in Lesson 3: Get Ready and Lesson 4: Set Up the Spreadsheet, you are ready to move forward in preparing your digital tracker and planner.
In this lesson, you are going to focus on a scenario where you get one paycheck per month. This mimics a basic budget approach: income minus expenses.
- If this is your situation, this is the last lesson 5 you need.
- If it is not your situation, this lesson can help you understand the benefit of working towards a Front Loaded Paycheck Plan presented in Lesson 5d.
Let’s get started with the following tasks.
- Enter financial commitments and income
- Add actual starter data
- Update the balance calculations
- Tweak the plan
Enter Financial Commitments and Income
In Lesson 3: Get Ready you gathered the type of commitment, the anticipated amount, and the due dates. Add this information to the sheet for twelve months from your selected start date using the following instructions.
- Enter one month’s worth of information (as shown in figure 2 below), leaving a few lines at the top of the list for when you are ready to add the current balance and outstanding commitments not cashed. Don’t worry about leaving enough or too many. Rows can be inserted or deleted when you are ready.

- Copy and paste the month eleven times and change the dates accordingly.

- Insert rows for expenses that occur semi-annually or annually. For example, three commitments might be
- Tuition for your master’s degree.
- Annual tax bill because you suspect this year’s tax bill will likely be the same last year.
- Personal property tax, but the screenshots don’t show it.

Add Actual Starter Data
Now your digital tracker and planner is ready to receive actual versus planned data. If you need to add more rows, please do so. In the example below, the following have been added:
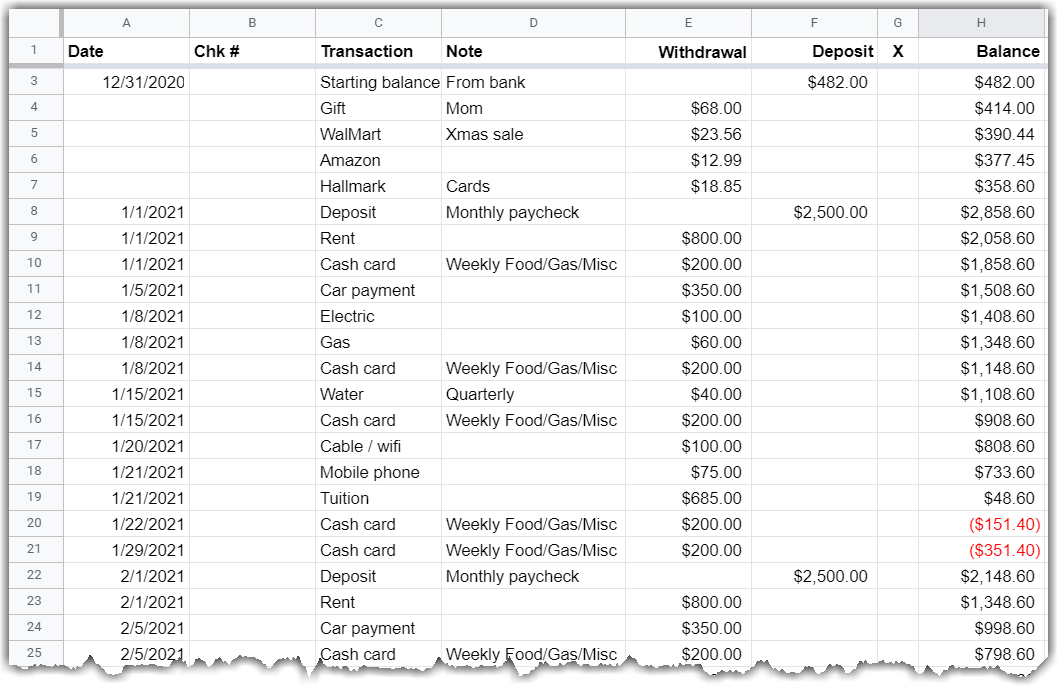
- Starting balance as a deposit. This is the current balance of your checking account. This is also the time when the digital tracker and planner replaces your paper check register.
- Outstanding commitments that you know have not cleared the bank as withdrawals. In this scenario, holiday related purchases.
- In this scenario, all of the December bills have been paid and processed by the bank.

Update the Balance Calculations
In this step, you will learn a very important aspect regarding sequenced formulas: patching. I just made up the term patching because I needed to call it something. However, you will see with the following mini-tutorial below makes that term descriptive.
Observe the gap in the formulas caused by the Amazon and Hallmark purchases in figure 6.

Incorrect Way to Patch the Gap
Your first thought might be to copy the formula from row 5 to the empty rows: 6 and 7. Let’s see why that won’t work. The image below shows the formulas from the balance column.
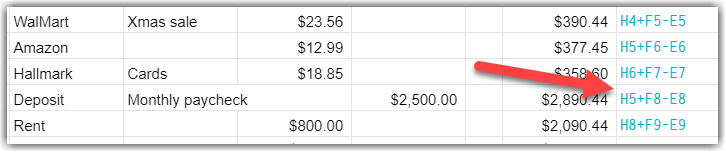
Notice the following:
- Formula inconsistency. The H value, how it goes from 4 to 5 to 6 to 5 to 8. The H value should always increase by 1, therefore the second 5 value is the problem.
- The balance doesn’t change. Line 8 before the formula insert is $2,890.44. Line 8 remains the same after copying the formula into the empty lines when it should decrease.
Correct Way to Patch the Gap
- Let’s delete the wrong formulas from rows 6 and 7 and start again.

- Stretch the highlight from the formula above to the formula below the gap.

- Click Ctrl+D on a PC or Command+D on a Mac to duplicate the formulas. I described this process recently as, “It’s like spreading peanut butter.” My client recommended I share that here.

- Observe the changes.
- The H value increases by 1 before and after the gap is patched.
- The balance decreases from $2,890.44 to $2,858.60 on row 8, accordingly.
- Now, fill in the rest of the formulas. Highlight the last formula and the subsequent cells.
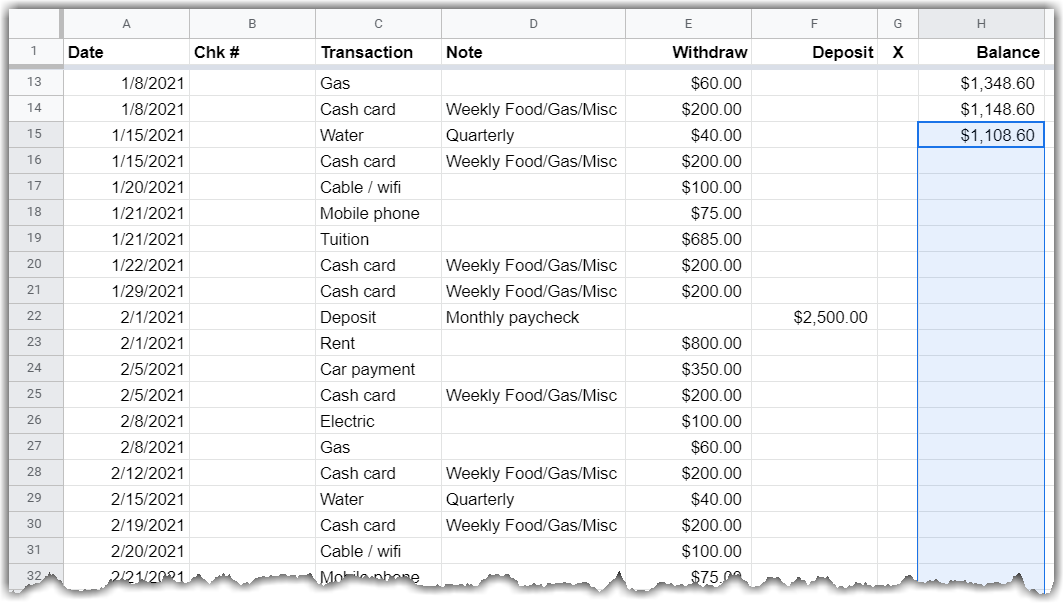
- Duplicate the formulas by clicking Ctrl+D on a PC and Command+D on a Mac.
- Observe what happened in this example. Did something similar happen to you?
- The lagging expenses from December haven’t cleared the bank, but you are setting aside that money for when they do. It’s likely that you have those amounts in your paper check register so this isn’t anything new. However, I have found that not everyone is as diligent in keeping track.
- Notice that if your budget for Food/Gas/Misc. is used as planned, you will be spending more than you have available. That’s not something you want to do.
- Consider addressing negative balance options
- Preferred options
- Cut back – Don’t spend the $200 each week for Food/Gas/Misc. Clip coupons. Buy generic. Wait until you have the money. Immediate gratification can lead to financial problems.
- School loan – This big bill is unusual and might be the contributing to the negative balance. Consider applying for installment payments through the semester. That allows you to pay what you can each month.
- Potentially dangerous options – Borrowing for day-to-day living, be it via a credit card or from your own savings, creates unwanted debt that can snowball out of control and/or depletes savings meant for more urgent matters.
- Credit card – If you need a credit card to eat, you aren’t living within your means. However, your semester bill might be paid this way if a low-rate school loan is not available.
- Savings – Assuming you have a savings, what was it intended to support?
- School? – Okay. This makes sense for the tuition bill. Insert a row in the digital tracker and planner for the $685.00 deposit. That will offset the check for your tuition payment.
- Emergency? – Emergencies refer to scenarios such as large medical expenses or the loss of a job. Spend this account and you leave yourself vulnerable.
- Preferred options
“I spent my paycheck on what I wanted when I wanted. Then, when my truck broke down, I couldn’t pay for the repair. So, I spent my inheritance on the repair instead of the house my grandparents hoped I would use it for.”
– anonymous client
Tweak the Plan
Planning a negative balance is not a good plan, obviously. So, how can you turn the red into black?

Several adjustments were made to lower commitments and balance the plan up to tax season.
- Correct a quarterly commitment recorded for each month: Water bill. That only happens every three months.
- Reduce weekly allowance for Food/Gas/Misc. from $200 to $175, or lower. It might mean brown bagging lunch and drinking the free office coffee. It could also mean not indulging in vaping or smoking, for instance.
- Obtain a student loan that breaks your tuition payment into five installments. If this doesn’t work, consider
- Using a credit card. There will be interest applied, but you might owe interest in the installment plan as well. Set up a five month payment plan to pay off the credit card.
- Using your savings. The same payment plan applies so you can pay yourself back and rebuild your savings.
- The negative balance anticipated near tax time is still an issue. When the time comes, this amount might be more or less. However, the same payment options apply.
- Return to the budget and see it you can live on $150 a week to lower the potential negative balance even further.
- Use a credit card that you payoff quickly.
- Borrow from yourself but payback savings quickly. Do not take money from your 401K. It’s a bad habit to start and it can be expensive as you will owe taxes on it.
Next Lesson …
Your next lesson depends on your specific situation.
- If your paycheck deposit matches this scenario, move onto Lesson 6: Tracking Actual Commitments.
- If your paycheck deposits are different, choose the next Lesson 5 option that best represents your situation.

6 thoughts on “Lesson 5a: Single Monthly Paycheck Plan”